Build AWS Webteir With Terraform | Infra-As-Code

I am a Technology Designer and YouTuber who likes to write Technical Blogs and contribute to Open Source which mainly includes Cloud, DevOps,Linux etc.
Welcome back to the series of Deploying On AWS Cloud Using Terraform 👨🏻💻. This terraform usecase is created for DevOps - Infrastructure Automation on AWS Project. Based on our previous learnings from the last 10 blog series we are going to create a real-time basic web application tier to have some hands-on and understand how its implementation works in real-time.
Are you looking to set up a robust web infrastructure on Amazon Web Services (AWS) quickly and efficiently? Look no further! In this comprehensive guide, we'll walk you through the process of deploying AWS Webteir with Terraform, a powerful infrastructure as code (IaC) tool. Whether you're a seasoned AWS user or just starting your journey into cloud computing, this tutorial is designed to simplify the deployment process and help you get your web infrastructure up and running in no time.
With Terraform's automation capabilities, setting up AWS Webteir becomes a breeze. You'll learn how to leverage Terraform scripts to automate the provisioning of resources like load balancers, auto-scaling groups, and EC2 instances, ensuring a scalable and resilient infrastructure for your web applications. Follow along step-by-step as we guide you through the configuration process, providing helpful tips and best practices along the way. By the end of this tutorial, you'll have a deep understanding of how to use Terraform to deploy AWS Webteir and the confidence to manage your web infrastructure with ease. Let's dive in and get started!
If you are a beginner for Terraform and want to start your journey towards infra-as-code developer as part of your DevOps role, buckle up 🚴♂️ and let's get started and understand core Terraform concepts by implementing it...🎬
❗️❗️Prerequisites❗️❗️
Before diving into the deployment process, ensure you have the following prerequisites:
AWS Account: You need an AWS account to deploy resources.
Terraform Installed: Install Terraform on your local machine. You can download it from Terraform's official site.
AWS CLI Configured: Configure the AWS CLI with your AWS credentials to allow Terraform to communicate with AWS.
Basic Understanding of AWS Services: Familiarize yourself with AWS services like VPC, EC2, ALB, IAM, etc.
🔎Basic Terraform Configurations🔍
As part of the basic configuration we are going to set up 3 terraform files
Providers File:- Terraform relies on plugins called "providers" to interact with cloud providers, SaaS providers, and other APIs.
Providers are distributed separately from Terraform itself, and each provider has its own release cadence and version numbers.
The Terraform Registry is the main directory of publicly available Terraform providers, and hosts providers for most major infrastructure platforms. Each provider has its own documentation, describing its resource types and their arguments.
We would be using AWS Provider for our terraform series. Make sure to refer Terraform AWS documentation for up-to-date information.
Provider documentation in the Registry is versioned; you can use the version menu in the header to change which version you're viewing.
provider "aws" {
  region                  = "var.AWS_REGION"
  shared_credentials_file = "<Your AWS Credentials File path>"
}
Variables File:- Terraform variables lets us customize aspects of Terraform modules without altering the module's own source code. This allows us to share modules across different Terraform configurations, reusing the same data at multiple places.
When you declare variables in the root terraform module of your configuration, you can set their values using CLI options and environment variables. When you declare them in child modules, the calling module should pass values in the module block.
variable "AWS_REGION" {
  default = "us-east-1"
}
#-------------------------Variables For Autoscaling---------------------
variable "instance_type" {
  type    = string
  default = "t2.micro"
}
variable "autoscaling_group_min_size" {
  type    = number
  default = 2
}
variable "autoscaling_group_max_size" {
  type    = number
  default = 3
}
variable "aws_key_pair" {
  type    = string
  default = "<File Path>"
}
#-------------------------Data Block to fetch subnet ids---------------------
data "aws_subnet_ids" "GetSubnet_Ids" {
  vpc_id = aws_vpc.CustomVPC.id
  filter {
    name   = "tag:Type"
    values = ["Public"]
  }
}
Versions File:- It's always a best practice to maintain a version file where you specific version based on which your stack is testing and live on production.
terraform {
  required_version = ">= 0.12"
}
🎨 Diagrammatic Representation 🎨
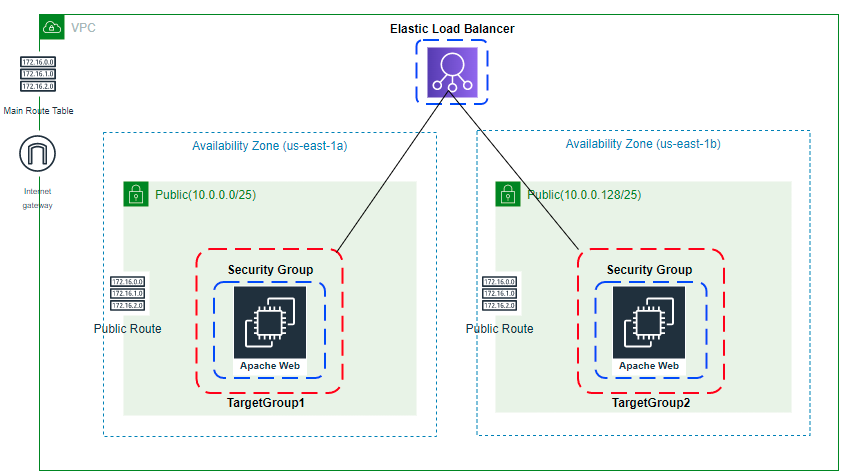
Deploying Web Application Layer
Now, let's break down the deployment process into several steps:
- Create Custom VPC, IGW, And Associate with VPC: Define a custom VPC, create an internet gateway (IGW), and associate it with the VPC to enable internet access.
# Terraform code for creating Custom VPC, IGW, and associating with VPC
resource "aws_vpc" "CustomVPC" {
  cidr_block           = "10.0.0.0/16"
  instance_tenancy     = "default"
  enable_dns_support   = true
  enable_dns_hostnames = true

  tags = {
    Name = "CustomVPC"
  }
}

resource "aws_internet_gateway" "IGW" {
  vpc_id = aws_vpc.CustomVPC.id

  tags = {
    Name = "IGW"
  }
}
- Create 2 Public Subnets, Custom Public Route Table, and Associate Them: Set up two public subnets within the VPC, create a custom public route table, and associate the subnets with the route table for routing internet traffic.
# Terraform code for creating Public Subnets, Public Route Table, and associating them
resource "aws_subnet" "PublicSubnet1" {
  vpc_id                  = aws_vpc.CustomVPC.id
  cidr_block              = "10.0.0.0/18"
  availability_zone       = "us-west-2a"
  map_public_ip_on_launch = true

  tags = {
    Name = "PublicSubnet1"
    Type = "Public"
  }
}

resource "aws_subnet" "PublicSubnet2" {
  vpc_id                  = aws_vpc.CustomVPC.id
  cidr_block              = "10.0.64.0/18"
  availability_zone       = "us-west-2b"
  map_public_ip_on_launch = true

  tags = {
    Name = "PublicSubnet2"
    Type = "Public"
  }
}

resource "aws_route_table" "PublicRouteTable" {
  vpc_id = aws_vpc.CustomVPC.id

  route {
    cidr_block = "0.0.0.0/0"
    gateway_id = aws_internet_gateway.IGW.id
  }
  tags = {
    Name = "PublicRouteTable"
  }
}

resource "aws_route_table_association" "PublicSubnetRouteTableAssociation1" {
  subnet_id      = aws_subnet.PublicSubnet1.id
  route_table_id = aws_route_table.PublicRouteTable.id
}

resource "aws_route_table_association" "PublicSubnetRouteTableAssociation2" {
  subnet_id      = aws_subnet.PublicSubnet2.id
  route_table_id = aws_route_table.PublicRouteTable.id
}
- Create Target Group: Define a target group for the load balancer to route traffic to EC2 instances.
# Terraform code for creating Target Group
resource "aws_lb_target_group" "CustomTG" {
  name        = "CustomTG"
  port        = 80
  protocol    = "HTTP"
  vpc_id      = aws_vpc.CustomVPC.id
  target_type = "instance"

  health_check {
    interval            = 30
    path                = "/"
    protocol            = "HTTP"
    timeout             = 5
    healthy_threshold   = 2
    unhealthy_threshold = 2
  }
}
- Create Load Balancer, Load Balancer Listener, and Security Group For Load Balancer: Set up an Application Load Balancer (ALB), configure a listener for HTTP traffic, and define a security group to control inbound and outbound traffic to the load balancer.
# Terraform code for creating Load Balancer, Load Balancer Listener, and Security Group
resource "aws_security_group" "elb_sg" {
  name        = "allow_http_elb"
  description = "Allow http inbound traffic for elb"
  terraformCopy code  vpc_id      = aws_vpc.CustomVPC.id

  ingress {
    from_port   = 443
    to_port     = 443
    protocol    = "tcp"
    cidr_blocks = ["0.0.0.0/0"]
  }

  ingress {
    from_port   = 80
    to_port     = 80
    protocol    = "tcp"
    cidr_blocks = ["0.0.0.0/0"]
  }

  egress {
    from_port   = 0
    to_port     = 0
    protocol    = "-1"
    cidr_blocks = ["0.0.0.0/0"]
  }

  tags = {
    Name = "terraform-elb-security-group"
  }
}

resource "aws_alb" "CustomELB" {
  name            = "CustomELB"
  depends_on      = [aws_subnet.PublicSubnet1, aws_subnet.PublicSubnet2]
  security_groups = [aws_security_group.elb_sg.id]
  subnets         = data.aws_subnets.GetSubnet.ids

  tags = {
    Name = "CustomELB"
  }
}

resource "aws_lb_listener" "http" {
  load_balancer_arn = aws_alb.CustomELB.arn
  port              = "80"
  protocol          = "HTTP"

  default_action {
    type = "forward"
    forward {
      target_group {
        arn = aws_lb_target_group.CustomTG.arn
      }
      stickiness {
        enabled  = true
        duration = 28800
      }
    }
  }
}
- Create Security Group, IAM Role, Policy, and Instance Profile for EC2: Define a security group for EC2 instances, create an IAM role with policies for EC2, and associate an instance profile with the role.
# Terraform code for creating Security Group, IAM Role, Policy, and Instance Profile for EC2
resource "aws_security_group" "ec2_sg" {
  name        = "allow_http_ec2"
  description = "Allow http inbound traffic for EC2"
  vpc_id      = aws_vpc.CustomVPC.id

  ingress {
    from_port       = 22
    to_port         = 22
    protocol        = "tcp"
    cidr_blocks     = ["0.0.0.0/0"]
  }

  ingress {
    from_port       = 80
    to_port         = 80
    protocol        = "tcp"
    security_groups = [aws_security_group.elb_sg.id]
  }

  ingress {
    from_port   = 80
    to_port     = 80
    protocol    = "tcp"
    cidr_blocks = ["0.0.0.0/0"]
  }

  egress {
    from_port   = 0
    to_port     = 0
    protocol    = "-1"
    cidr_blocks = ["0.0.0.0/0"]
  }

  tags = {
    Name = "terraform-ec2-security-group"
  }
}

resource "aws_iam_role" "ec2_role" {
  name = "ec2_ssm_role"

  assume_role_policy = jsonencode({
    Version = "2012-10-17",
    Statement = [
      {
        Effect = "Allow",
        Principal = {
          Service = "ec2.amazonaws.com"
        },
        Action = "sts:AssumeRole"
      }
    ]
  })
}

resource "aws_iam_policy_attachment" "ssm_role_policy_attachment" {
  name       = "attach_ssm_policy"
  roles      = [aws_iam_role.ec2_role.name]
  policy_arn = "arn:aws:iam::aws:policy/AmazonSSMManagedInstanceCore"
}

resource "aws_iam_instance_profile" "ec2_instance_profile" {
  name = "ec2_instance_profile"
  role = aws_iam_role.ec2_role.name
}
- Create ASG Launch Configuration and Autoscaling Group: Define a launch configuration specifying the instance properties, and set up an autoscaling group to automatically adjust the number of EC2 instances based on demand.
terraformCopy code# Terraform code for creating ASG Launch Configuration
resource "aws_launch_configuration" "webteir_launch_config" {
  name_prefix                 = "webteir"
  image_id                    = data.aws_ami.latest_amazon_linux.id
  instance_type               = "t2.micro"
  security_groups             = [aws_security_group.ec2_sg.id]
  iam_instance_profile        = aws_iam_instance_profile.ec2_instance_profile.name
  associate_public_ip_address = true
  user_data                   = file("userdata.sh")
  lifecycle {
    create_before_destroy = true
  }
}

# Terraform code for creating Autoscaling Group
resource "aws_autoscaling_group" "autoscaling_group_webteir" {
  depends_on           = [aws_subnet.PublicSubnet1, aws_subnet.PublicSubnet2]
  launch_configuration = aws_launch_configuration.webteir_launch_config.id
  min_size             = var.autoscaling_group_min_size
  max_size             = var.autoscaling_group_max_size
  target_group_arns    = ["${aws_lb_target_group.CustomTG.arn}"]
  vpc_zone_identifier  = data.aws_subnets.GetSubnet.ids

  tag {
    key                 = "Name"
    value               = "autoscaling-group-webteir"
    propagate_at_launch = true
  }
}
- Output for the Terraform Code: Display relevant output variables like the load balancer DNS name, autoscaling group details, etc., for reference.
terraformCopy code# Terraform output variables
output "load_balancer_dns_name" {
  value = aws_alb.CustomELB.dns_name
}

output "autoscaling_group_details" {
  value = aws_autoscaling_group.autoscaling_group_webteir
}
🔊To view the entire GitHub code clickhere
1️⃣ The terraform fmt command is used to rewrite Terraform configuration files to a canonical format and style👨💻.
terraform fmt
2️⃣ Initialize the working directory by running the command below. The initialization includes installing the plugins and providers necessary to work with resources. 👨💻
terraform init
3️⃣ Create an execution plan based on your Terraform configurations. 👨💻
terraform plan
4️⃣ Execute the execution plan that the terraform plan command proposed. 👨💻
terraform apply -auto-approve
👁🗨👁🗨 YouTube Tutorial 📽
[Coming Soon]
❗️❗️Important Documentation To Be Viewed❗️❗️
⛔️ Hashicorp Terraform
⛔️ AWS CLI
⛔️ Hashicorp Terraform Extension Guide
⛔️ Terraform Autocomplete Extension Guide
⛔️ AWS VPC
⛔️ AWS Internet Gateway
⛔️ AWS Subnet
⛔️ AWS Route Table
⛔️ AWS Route Table Association
⛔️ AWS Security Group
⛔️ AWS Target Group
⛔️ AWS Target Group Attachment
⛔️ Terraform Length Function
⛔️ AWS Load Balancer
⛔️ AWS Load Balancer Listener
⛔️ AWS Launch Configuration
⛔️ AWS Autoscaling Group
⛔️ Lifecycle Meta-Argument
🥁🥁 Conclusion 🥁🥁
In conclusion, deploying AWS Webteir with Terraform offers unparalleled flexibility and efficiency for managing your web infrastructure on AWS. By harnessing the power of infrastructure as code, you can easily provision and manage resources with ease, ensuring scalability, reliability, and cost-effectiveness for your web applications. With Terraform's declarative syntax and modular approach, you can streamline the deployment process and adapt to evolving requirements seamlessly. Whether you're launching a new web project or optimizing an existing infrastructure, Terraform empowers you to achieve your goals faster and with greater confidence. So why wait? Start building your AWS Webteir infrastructure today and unlock the full potential of cloud computing for your business.
📢 Stay tuned for my next blog.....
🎊**So, did you find my content helpful? If you did or like my other content, feel free to buy me a coffee. Thanks. **🎊


